全志V3S编译运行带以太网和USB的Linux全流程记录

这篇文章的小目录展开 / 收起

芯片启动的全过程大概是:Bootloader-Kernel-RootFS

对于我们这次实验来说,就是:uboot-linux kernel6.1.19-Buildroot

环境准备

本次实验宿主机使用全新的Ubuntu20.04环境,并在完成实验后用户目录下有以下结构的文件夹。

首先需要创建架构。

workspace
- linux
- partitions
-- boot
--- boot.scr
--- sun8i-v3s-licheepi-zero.dtb
--- zImage
-- root
- u-boot
- modules
- buildroot
- boot.cmd

然后下载所有本次实验会使用到的代码和依赖。

# 安装依赖
sudo apt-get install flex bison gcc make gcc-arm-linux-gnueabihf libncurses-dev swig python-dev device-tree-compiler python3-setuptools python3-dev libssl-dev u-boot-tools g++ patch

# 下载Mainline Linux,你可以在https://www.kernel.org寻找最新的LTS版本
wget https://cdn.kernel.org/pub/linux/kernel/v6.x/linux-6.1.19.tar.xz
# extract是zsh提供的自动解压指令,可以替换成tar的对应格式解压指令
extract linux-6.1.19.tar.xz
mv linux-6.1.19 linux

# 下载U-Boot,我们这里没有使用LTS版本,你可以进入cd进去后切换到LTS分支
git clone git://git.denx.de/u-boot.git

# 下载Buildroot,你可以在https://buildroot.org/downloads寻找最新的版本
wget https://buildroot.org/downloads/buildroot-2023.02.tar.xz
extract buildroot-2023.02.tar.xz
mv buildroot-2023.02 buildroot

每一章节结束后请返回workspace目录。

编译U-Boot

cd u-boot
# 使用荔枝派Nano的默认配置
make CROSS_COMPILE=arm-linux-gnueabihf- LicheePi_Zero_defconfig
# 编译
make CROSS_COMPILE=arm-linux-gnueabihf-
# 拷贝U-Boot镜像
cp u-boot-sunxi-with-spl.bin ../partitions

接下来我们需要准备U-Boot启动所需的配置文件,将以下内容写入boot.cmd。

setenv bootargs console=tty0 console=ttyS0,115200 panic=5 rootwait root=/dev/mmcblk0p2 rw
load mmc 0:1 0x43000000 sun8i-v3s-licheepi-zero.dtb
load mmc 0:1 0x42000000 zImage
bootz 0x42000000 - 0x43000000

接着编译配置文件。

mkimage -C none -A arm -T script -d boot.cmd ./partitions/boot/boot.scr

编译Kernel

cd linux
# 使用linux-sunxi项目的默认配置,该项目主要包含全志各芯片的硬件支持文档和手册
make ARCH=arm CROSS_COMPILE=arm-linux-gnueabihf- sunxi_defconfig
# 进入内核配置菜单
make ARCH=arm CROSS_COMPILE=arm-linux-gnueabihf- menuconfig

我们需要修改arch/arm/boot/dts/sun8i-v3s-licheepi-zero.dts以启用以太网和USB支持。

/*
* Copyright (C) 2016 Icenowy Zheng <icenowy@aosc.xyz>
*
* This file is dual-licensed: you can use it either under the terms
* of the GPL or the X11 license, at your option. Note that this dual
* licensing only applies to this file, and not this project as a
* whole.
*
* a) This file is free software; you can redistribute it and/or
* modify it under the terms of the GNU General Public License as
* published by the Free Software Foundation; either version 2 of the
* License, or (at your option) any later version.
*
* This file is distributed in the hope that it will be useful,
* but WITHOUT ANY WARRANTY; without even the implied warranty of
* MERCHANTABILITY or FITNESS FOR A PARTICULAR PURPOSE. See the
* GNU General Public License for more details.
*
* Or, alternatively,
*
* b) Permission is hereby granted, free of charge, to any person
* obtaining a copy of this software and associated documentation
* files (the "Software"), to deal in the Software without
* restriction, including without limitation the rights to use,
* copy, modify, merge, publish, distribute, sublicense, and/or
* sell copies of the Software, and to permit persons to whom the
* Software is furnished to do so, subject to the following
* conditions:
*
* The above copyright notice and this permission notice shall be
* included in all copies or substantial portions of the Software.
*
* THE SOFTWARE IS PROVIDED "AS IS", WITHOUT WARRANTY OF ANY KIND,
* EXPRESS OR IMPLIED, INCLUDING BUT NOT LIMITED TO THE WARRANTIES
* OF MERCHANTABILITY, FITNESS FOR A PARTICULAR PURPOSE AND
* NONINFRINGEMENT. IN NO EVENT SHALL THE AUTHORS OR COPYRIGHT
* HOLDERS BE LIABLE FOR ANY CLAIM, DAMAGES OR OTHER LIABILITY,
* WHETHER IN AN ACTION OF CONTRACT, TORT OR OTHERWISE, ARISING
* FROM, OUT OF OR IN CONNECTION WITH THE SOFTWARE OR THE USE OR
* OTHER DEALINGS IN THE SOFTWARE.
*/

/dts-v1/;
#include "sun8i-v3s.dtsi"
#include "sunxi-common-regulators.dtsi"

/ {
model = "Lichee Pi Zero";
compatible = "licheepi,licheepi-zero", "allwinner,sun8i-v3s";

aliases {
serial0 = &uart0;
ethernet0 = &emac;
};

chosen {
stdout-path = "serial0:115200n8";
};

leds {
compatible = "gpio-leds";

blue_led {
label = "licheepi:blue:usr";
gpios = <&pio 6 1 GPIO_ACTIVE_LOW>; /* PG1 */
};

green_led {
label = "licheepi:green:usr";
gpios = <&pio 6 0 GPIO_ACTIVE_LOW>; /* PG0 */
default-state = "on";
};

red_led {
label = "licheepi:red:usr";
gpios = <&pio 6 2 GPIO_ACTIVE_LOW>; /* PG2 */
};
};

soc {
ehci0: usb@01c1a000 {
compatible = "allwinner,sun8i-v3s-ehci", "generic-ehci";
reg = <0x01c1a000 0x100>;
interrupts = <GIC_SPI 72 IRQ_TYPE_LEVEL_HIGH>;
clocks = <&ccu CLK_BUS_EHCI0>, <&ccu CLK_BUS_OHCI0>;
resets = <&ccu RST_BUS_EHCI0>, <&ccu RST_BUS_OHCI0>;
status = "okay";
};

ohci0: usb@01c1a400 {
compatible = "allwinner,sun8i-v3s-ohci", "generic-ohci";
reg = <0x01c1a400 0x100>;
interrupts = <GIC_SPI 73 IRQ_TYPE_LEVEL_HIGH>;
clocks = <&ccu CLK_BUS_EHCI0>, <&ccu CLK_BUS_OHCI0>,
<&ccu CLK_USB_OHCI0>;
resets = <&ccu RST_BUS_EHCI0>, <&ccu RST_BUS_OHCI0>;
status = "okay";
};
};
};

&mmc0 {
broken-cd;
bus-width = <4>;
vmmc-supply = <&reg_vcc3v3>;
status = "okay";
};

&uart0 {
pinctrl-0 = <&uart0_pb_pins>;
pinctrl-names = "default";
status = "okay";
};

&usb_otg {
dr_mode = "host";
status = "okay";
};

&usbphy {
usb0_id_det-gpios = <&pio 5 6 GPIO_ACTIVE_LOW>;
status = "okay";
};

&emac {
allwinner,leds-active-low;
status = "okay";
};

接着执行以下指令。

# 编译内核,-j4的4可以修改为你的CPU核心数
ARCH=arm CROSS_COMPILE=arm-linux-gnueabihf- make -j4 zImage
# 编译DTB文件,本文件用于Kernel识别外设,是 Mainline Kernel不可缺少的部分,-j4的4可以修改为你的CPU核心数
ARCH=arm CROSS_COMPILE=arm-linux-gnueabihf- make -j4 dtbs
# 编译Modules,-j4的4可以修改为你的CPU核心数
ARCH=arm CROSS_COMPILE=arm-linux-gnueabihf- make -j4 modules
# 安装模块
ARCH=arm CROSS_COMPILE=arm-linux-gnueabihf- INSTALL_MOD_PATH=../modules make modules modules_install
# 拷贝生成的zImage内核镜像和DTB文件
cp arch/arm/boot/zImage ../partitions/boot
cp arch/arm/boot/dts/suniv-f1c100s-licheepi-nano.dtb ../partitions/boot

编译Buildroot

我们使用Buildroot默认的BusyBox程序和GLIBC,如果需要剪裁大小,可以选择其他的C支持库。

cd buildroot
# 进入配置菜单
make menuconfig
配置位置操作用途
Target optionsTarget Arch设置为ARM (little endian)设置大小端
Target optionsTarget Arch Variant设置为cortex-a7设置CPU架构
ToolchainKernel Headers设置为你下载的LTS版本内核对应的版本号匹配内核版本
# 编译,Buildroot不支持多线程编译,所以不携带-j
make
# 拷贝解压文件系统和内核模块
cp output/images/rootfs.tar ../partitions/root
cd ../partitions/root
extract rootfs.tar
mv rootfs/* ./
rm -rf rootfs
rm rootfs.tar
cp -R ../../modules/* ./

同时修改partitions/root/etc/fstab文件中的ext2为ext4

写入SD卡

请替换CARD_PATH为你的SD卡设备路径,如/dev/sdb

cd partitions
# 清空分区表
dd if=/dev/zero of=CARD_PATH bs=1M count=1
# 写入U-Boot
dd if=u-boot-sunxi-with-spl.bin of=CARD_PATH bs=1024 seek=8
# 写入分区表,请复制除了本行内的内容并执行
blockdev --rereadpt CARD_PATH
cat <<EOT | sfdisk CARD_PATH
1M,16M,c
,,L
EOT
# 格式化
mkfs.vfat 第一个分区路径
mkfs.ext4 第二个分区路径
# 拷贝boot进入第一个分区
mount 第一个分区路径 /mnt
cp -R boot/* /mnt
sync
umount /mnt
# 拷贝rootfs进入第二个分区
mount 第二个分区路径 /mnt
cp -R root/* /mnt
sync
umount /mnt

开机测试

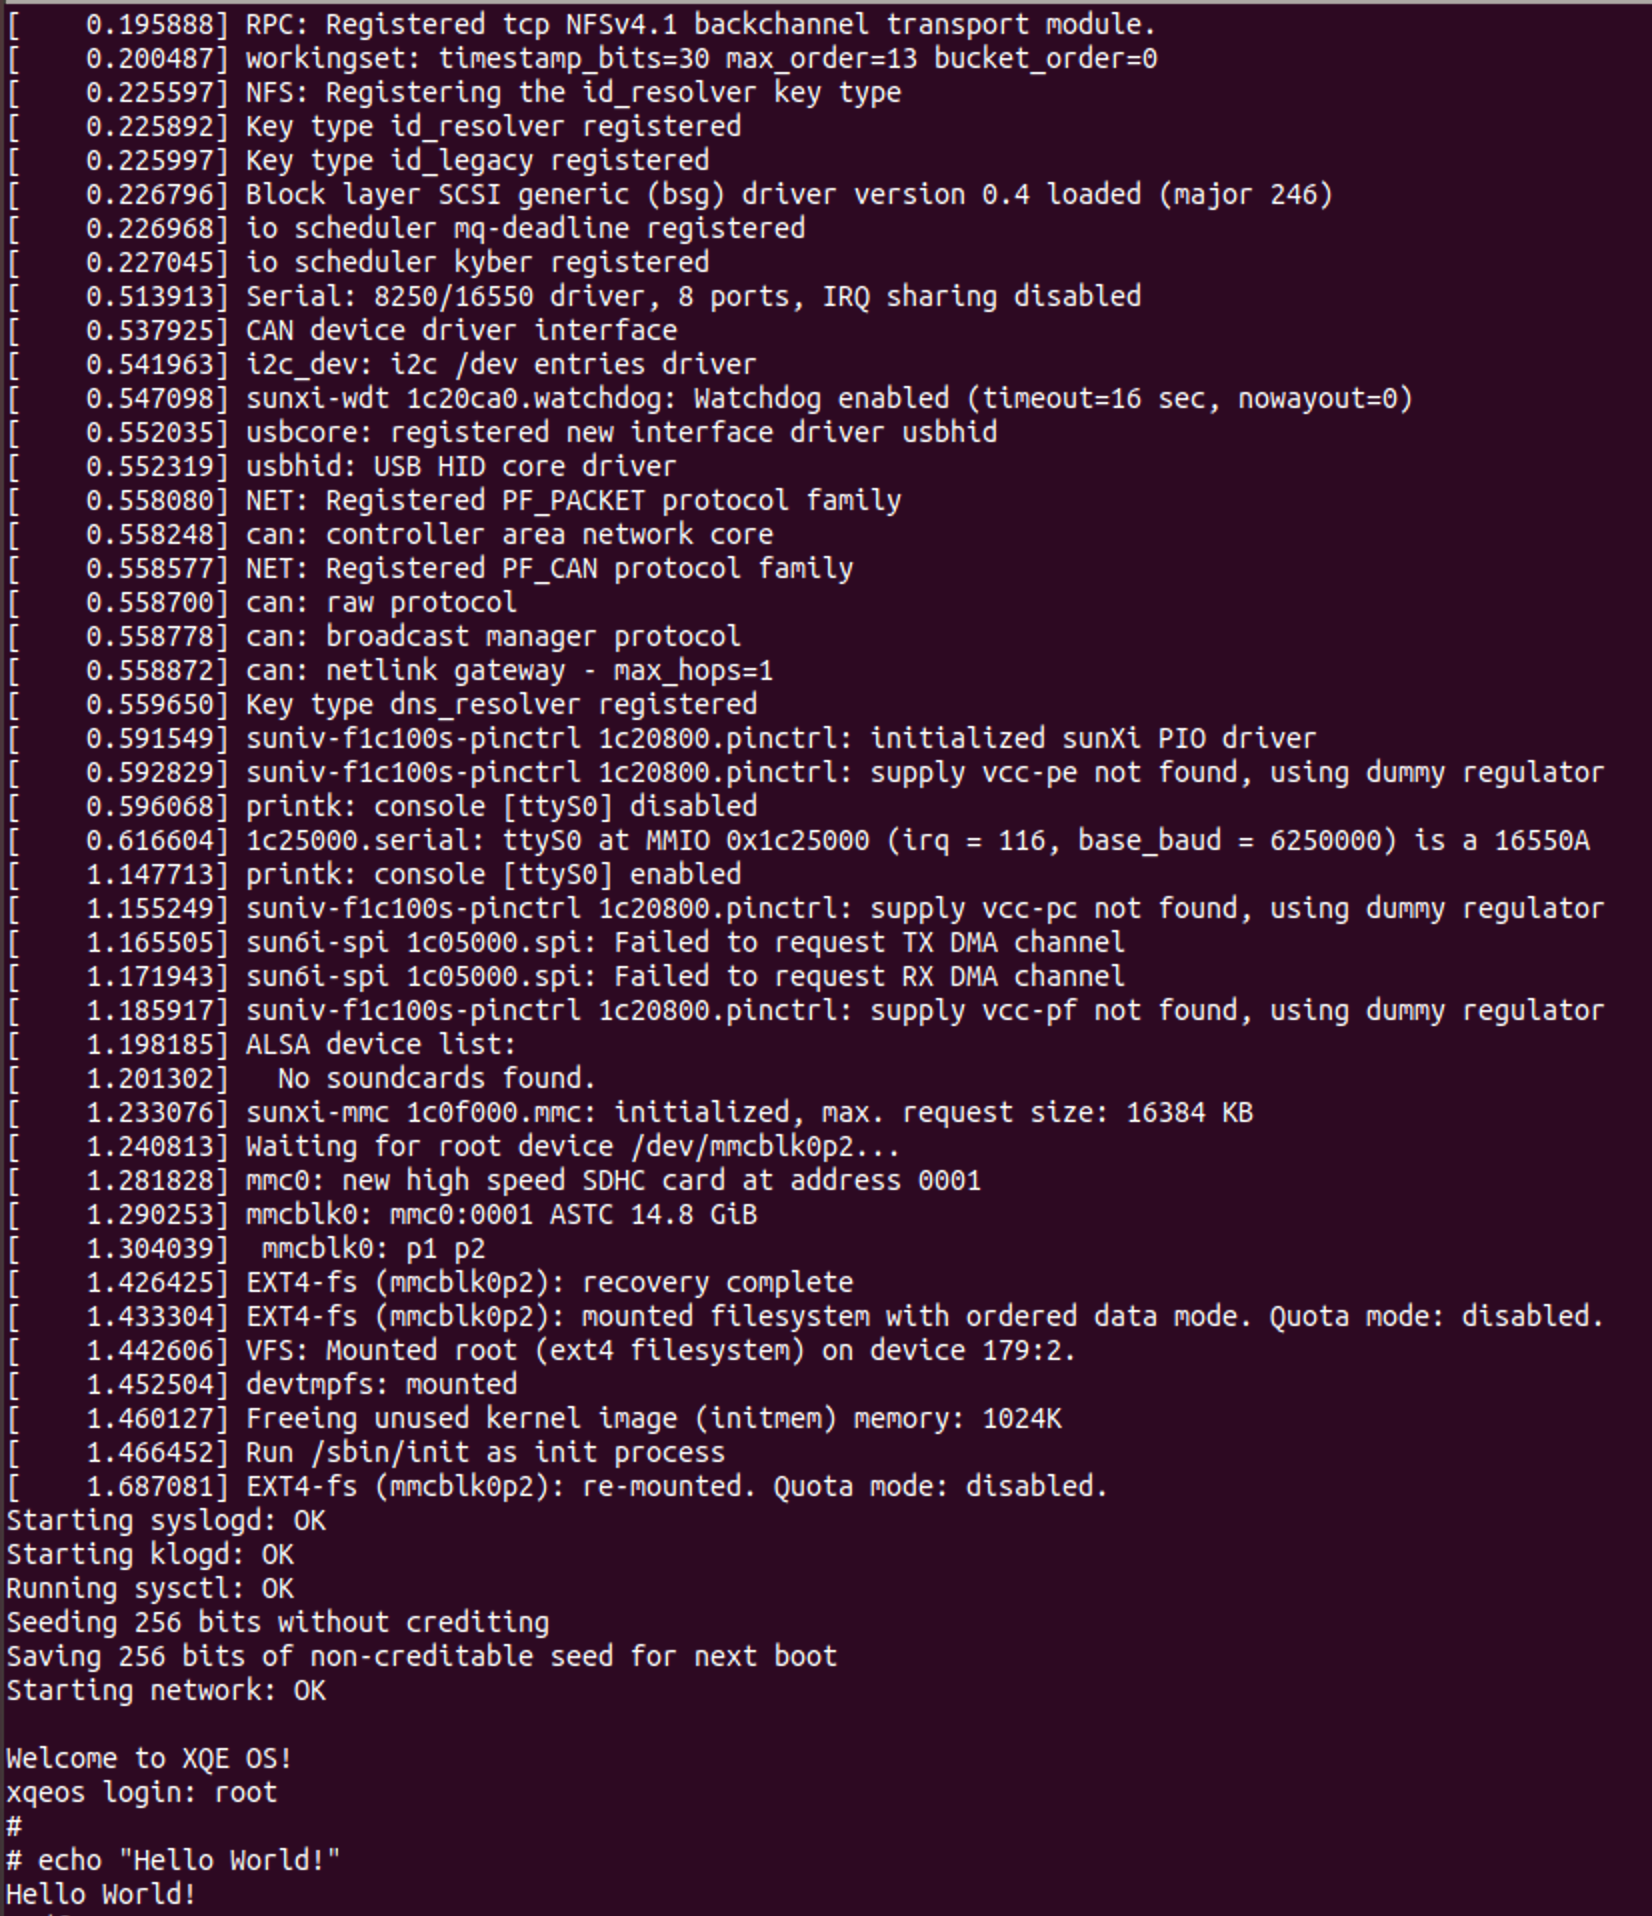
将SD卡安全拔出后插入设备,接入uart0后开机,可以看到U-Boot和Kernel的启动过程并顺利看到sh。

全志V3S编译运行带以太网和USB的Linux全流程记录 · 配图

参考文档

https://linux-sunxi.org/Manual_build_howto
https://linux-sunxi.org/Mainline_Kernel_Howto
https://linux-sunxi.org/Manual_build_howto
https://linux-sunxi.org/U-Boot

谢谢你读到这里 ♡

如果这份记录帮到了你,我会很开心。

LET'S LEAVE A LITTLE NOTE

来聊聊天吧♡

你的每一句话,都会让这座小房子更温暖。

正在打开留言本…

找一份小记录

输入关键词,找找房子里的宝藏。♡

搜索文章标题、正文、分类和标签 ⌘ / Ctrl + K